2018 Fall Home Maintenance Guide

Whether you are ready to believe it or not, fall officially began this past weekend. The long, sunny days of summer are over and now it’s time to begin preparing for the colder temperatures and shorter days that accompany winter. And with the changing of the season it is time once again to tackle some tasks around the house. Here are a few items that we think should be added to your to do list for the next few months.

 Stock Up on Winter Supplies

It may just be the beginning of the Fall but winter if just around the corner and chances are you’re going to start getting winter, or at least colder, weather before this season has officially ended. As such you may not want to delay much longer in stocking up on the supplies you will need to get you through the colder months to come. Things like firewood, ice melting supplies, and germ fighting supplies for flu season will be a lot easier to get now than when you get into winter and stocks will be more depleted.


Complete Exterior Painting

Is the outside of your home in need of a fresh coat of paint? Fall provides some of the most ideal weather for getting this task done. If the weather gets too hot or too cold then the paint will not dry correctly, leaving you with a messy finish that will not hold up well. A fresh paint job, even on something as simple as the front door, can add new life to your home. This is also a good time to restain and seal exterior woodwork. We recommend doing a thorough inspection to ensure it is in good condition beforehand so that you’re not wasting your time restaining something that will have to be replaced sooner rather than later.


Deep Clean the Kitchen

Fall may have just begun a few days ago, but the winter holidays will before here before you know it. More than likely that means you’ll be cooking up at least one, if not several, holiday feasts in your kitchen. Begin preparing now deep cleaning your kitchen so that it is ready to go when those holidays arrive. Focus on things that may not get done all that often, like the interior of your oven and refrigerator, grout and backsplashes, light fixtures, and garbage disposal. Give some attention to your pantry as well. Too often things get lost and forgotten about when they are stored away.

Winterize Outdoor Plumbing

Depending on where you live you might be able to delay on this task for a bit. Here in Texas we know that warm temperatures can last well into Fall and the first below freezing temperatures may not happen for weeks if not months. Keep an eye on the weather report in your area and once you see temperatures start to dip close to freezing make sure this task gets put up high on your to do list so that you don’t end up with any damaged pipes.

General Home Maintenance

Every time the season changes we recommend taking the time to clean out your gutters. In the fall you want to focus on making sure that they are ready to handle the influx of leaves that are about to descend and then, once those leaves have fallen, you want to make sure your gutters are cleared out to prevent ice dams from forming when the colder weather hits. Inspect your exterior doors and windows for drafts and apply new caulking and weatherstripping to any that need it so that you can keep the cold air out and the warm air in. Pick a good day to test run your heater before it’s truly needed to make sure it is working properly and clear out dust that has settled in the system since it was last used. The last thing you want is to find out your heater doesn’t work at a time when you really need it to.


Rake Leaves

One of the best parts about Fall is watching the color of the leaves change and then fall to the ground. But once they’ve finished their colorful transformation they can leave behind quite a mess with all the leaves that fall off. Once fallen leaves start to accumulate don’t put off raking and cleaning them up. If left to linger large piles of leaves can quickly become home to unwanted pests who may turn their sites on your home once the weather turns cold. They can also cause mold growth when the leaves get wet and are much harder to clean up than when they are dry. Plus come spring those leaves could hinder grass growth. So get out your rakes or leaf blowers and nip this issue in the bud before it can become a big problem.


Lawn Maintenance

Fall may seem like a weird time to be focusing on your landscaping, but proper care this time of year is key to healthy and flourishing plant life. One area that you will want to give some extra TLC is your lawn. Most grasses will slow down their growth or go completely dormant during the winter. But there is a lot happening beneath the soil to help the grass survive the winter and be ready to grow again come spring. One key thing you can do to help is to fertilize your lawn. How often you need to fertilize per year will depend on your region and the type of grass you have, but you should at least fertilize once a year in the fall.  

Plan Outdoor Living Remodels

With this past summer still fresh in your mind, this is the perfect time to sit down and think about any changes you may want to make so that the next summer even more enjoyable. Perhaps you found yourself thinking at one point how nice it would be if you had a larger outdoor grilling space, or your own firepit, or maybe even a pool. Next summer will be here before you know it. And if there is any outdoor living remodeling that you want to get done you’ll need to get started on it sooner rather than later so that it will be ready in time. Make designs for what you want to have done and start talking to general contractors or the specific professionals that you will need to make those dreams a reality.

Eight Tile Backsplashes in the Kitchen that Shine

When it comes to kitchen backsplashes, tile is easily one of the most popular options out there. It is a tried and tested material that lends itself well to the purpose of the backsplash. We’ve seen our fair share of tile backsplashes across the many kitchen projects we’ve done here at Key Residential, ranging from the classic types that feature subway or large set tile, to the more unique ones that include a mosaic pattern or are made from metal. Take a look at a few of our favorite kitchen tile backsplashes from projects past and perhaps get inspired for your own backsplash remodel.


The new mosaic backsplash was one of the few changes made during this kitchen remodel, but it made a world of difference in the room, proving that a successful remodel does not always need to involve substantial changes. The small mosaic pattern adds some drama and a small amount of color to the kitchen. Installing the tile in a diagonal pattern gives it an elevated and high-end feel. Using both light and dark tones complements the two different countertop materials that were used in the room and ties the design of the room together well.

The focus of this kitchen remodel was in honoring the home’s historical legacy and as such has a strong influence of traditional design. But the arabesque tile used for the backsplash gives the room a unique design feature that breaks slightly with the traditional feel without feeling too out of place. The tile has a 3-D element to it that is heightened by the undercabinet lighting reflecting off its glossy finished surface. Choosing white as the color of the tile helps to tie it in to the predominantly white kitchen and not allow its uniqueness to feel out of place among all the traditional styled features of the room.

Mosaic tile makes for a great backsplash choice when looking for a way to add some drama and uniqueness to the kitchen, especially when it is a smaller sized room. This outdoor kitchen is the perfect place to use a vivid and fun tile and pattern. The primarily green tile with hints of blues and browns provides a nice break from the heaviness of the brown tones in the wood cabinets and brick. The green tile also plays nicely with the nearby Big Green Egg. And since there isn’t a lot of space for the backsplash, the busy and colorful pattern does not overwhelm the space.

Looking to add some boldness and drama to your kitchen? Why not go with a metallic backsplash tile like the one used in this North Dallas kitchen. Without the backsplash the kitchen has a rather standard appearance with quartz countertops and light wood finished cabinets. But the small square shaped mosaic metal tiles elevate the kitchen to a new level, giving it a special touch that is anything but ordinary. It also blends well with the stainless steel finished appliances and the knife and utensil holder magnetic strips that are mounted on the backsplash.

There is a plethora of options when it comes to mosaic patterned tile. This kitchen features yet another version of the mosaic pattern with long, skinny strips of tile that alternate between a few coordinating colors. Contemporary styled kitchens, such as this one, are focused around clean simple lines that can sometimes come across as sterile and lacking in design. Choosing a busy, colorful tile backsplash helps this kitchen be anything but boring. It adds visual interest without becoming too overpowering within the simpler design elements of the room.

A more classical version of the tile backsplash was used in this traditional styled kitchen. The larger, neutral colored tiles give it a timeless appearance and is an ideal choice when creating a backsplash that will stay in style for as long as possible. But the backsplash avoids being boring or simple due to the inclusion of a strip of decorative tile just above the countertops. This tile adds some drama and interest to the backsplash so that it does not become an overlooked part of the room.


This kitchen features a luxurious marble subway tile that fits in marvelously with the high end look and feel of the room. The lighter color of the tile allows it to blend well with the white cabinetry and marble countertops but also stand out against the darker blue of the walls. The tile is also used as a backsplash for buffet cabinets in the adjacent morning room and breakfast room and helps to visually tie the two spaces together. By using the standard subway pattern to install the tile the marble nature of the tile can shine. From a distance it almost looks like it could be one solid piece of stone.

Metallic tile was also used in this kitchen, but this time instead of a mosaic pattern subway tile was used, proving the versatility of the uncommon material across all shapes and sizes. The tile is a goof complement for the kitchen’s modern design style which often favors clean, simple lines and the use of more unique materials like metal. The tile’s reflective and shiny nature fits in well with the glazed finish of the kitchen’s cabinetry and helps reflect the task lighting, especially when the purple accent lights are on.

Project Spotlight: A Remodeled Dallas Backyard is Outdoor Living at its Best

Summer and outdoor living go hand and hand here in Texas. And is really all that hard to see why? With our hot and sunny summers to the mostly moderate winters (save, of course, for the occasional burst of cold), enjoying the outdoors can be an easy and enjoyable task in the Lonestar State. That this Dallas home was lacking in ways to enjoy outdoor living was the true surprise. Luckily the homeowners decided to team up with Randy Angell Designs, Pool Environments, Jason Osterberger Designs, Claudine Roberts, and, of course, Key Residential, to create a multi-use outdoor living haven that would provide the with a plethora of options for enjoying the outdoors.


The back of the house was designed in a U shape and it originally had a small covered patio at the base of the U with large grassy areas taking up the rest of the backyard. The homeowners wanted to create more options for enjoying the outdoors at home for them and their children. Randy Angell Designs helped them to create their perfect outdoor living paradise. They designed the new backyard space to include a covered cabana, three separate pools, a built in firepit, a courtyard area in between the U-shaped rear wings of the house, and new landscaping throughout the area.

Key Residential’s part of the project focused on the covered cabana addition. The cabana includes an outdoor kitchen, dining area, living area, and enclosed half bath. The cabana was added onto one of the wings of the U shaped house. Dual French doors that match with existing exterior entry doors provide access to the new cabana from the home. They frame an existing fireplace inside of the house and a wall hung television in the entertainment area of the new cabana. The entertainment area has plenty of space for comfortable seating around the television for the entire family. Speakers are integrated throughout the cabana as well as throughout the entire outdoor living area so that sound can radiate throughout the space. So if someone is swimming in the pool or perhaps busy making s’mores at the firepit they can still keep up with whatever is on the TV or continue jamming to some tunes.

To the side of the entertainment area is the half bath. It includes a custom designed vanity cabinet with a quartz countertop, tile floors, and accent wallpaper. The mixture of textures and soft color palette give the room a relaxed and almost tropical vibe which is perfectly suited for an outdoor living bathroom.


The outdoor kitchen area of the cabana includes custom designed cabinets with quartz countertops and a glass subway tile backsplash. It features several appliances that are well suited for outdoor living, including a full-sized outdoor refrigerator, undercounter ice maker, two drop-in coolers, and a large apron sink with a gooseneck faucet and a separate filtered water faucet. Adjacent to the outdoor kitchen is the dining area. It has plenty of space to fit a full-size dining table where the family or guests can gather. With the nice weather that Texas offers we imagine the family takes full advantage of their ability to eat outdoors often. And for those who don’t feel like sitting at the table a long window seat bench provides additional seating in the area.


Year-round comfort and usability was an important factor in the design of the cabana. Two Big Ass Fans and four Infratech heaters provide temperature control for the space regardless of whether it is a 100 degree summer day or an unusually cold winter’s day. Bug screens were installed along the three exterior openings to provide additional comfort and safety from the elements. No more pesky flies or mosquitos getting in when the family is trying to enjoy a meal! The color of the screens was chosen to match the stucco and a thicker fabric was used so that the screens could also double as shades.

The pool was designed by Randy Angell and built by Pool Environments. It features an upper level general use pool with an adjacent hot tub on one end and a lower level lap pool on the other end. As former competitive swimmers, the lap pool allows the homeowners to continue doing what they love without having to leave the comfort of their own home. An infinity edge connects the upper pool to the lower lap pool. Concrete steps built into the foundation lead from the upper level areas to the lower level lap pool.

Jason Osterberger Designs completed the firepit area and landscaping throughout the new outdoor living spaces. With plenty of space for seating, the firepit serves as a great gathering place within the outdoor living space. Concrete pavers and new landscaping was installed throughout the outdoor living area to help connect the spaces within the spacious outdoor living area together.

The Open Floor Plan Kitchen vs. The Social Kitchen

For several years one of the top trends in kitchen design has been the open floor plan. These kitchens allow for greater function and flow between the work space of the kitchen and the areas where the rest of the family or guests gather. Furthermore, with the kitchen tending to function as the center of the house, an open floor plan concept provides better connectivity and accessibility to the entire home. At Key Residential we have seen first hand the popularity of open floor plan kitchens, both in our custom home builds and remodel projects. The design has many benefits and the trend seems here to stay, at least for the foreseeable future.


By using an open floor plan, this small kitchen feels bigger and can easily serve as a gathering point in the home.

But now that the open floor plan kitchen design has established a strong foothold, the next trend is in perfecting that design to truly capitalize on its benefits. So instead of creating just an open floor plan kitchen, take it a step further to achieve a social kitchen. The social kitchen, like the name implies, places a heavy emphasis on the social aspect of an open floor plan kitchen. People want to be able to easily connect with others who are nearby, whether they are also in the kitchen or in the adjacent living area. So how do you make sure your open floor plan kitchen is also a social kitchen? It all comes down to smart space planning.


By spreading out major appliances, this kitchen can easily accommodate multiple users. The oven is located along one wall, the main sink along another, and the island houses both the range and an additional sink, all without having to sacrifice ample countertop space.

One of the first ways to help create a social kitchen is to ensure that it can accommodate multiple users at one time. Spreading key items and functions out more in the kitchen will help. For starters, take the work triangle concept to the next level by creating multiple work triangles. Don’t put all the cooking appliances next to each other. By spreading them out it will be easier for multiple items to be used at a single time when there are extra hands pitching in to help. Having ample counter space is also key. As with appliances, having plenty of counterspace and spread out tasks is a benefit. A large island could be a great asset. Finding ways to spread out the duties of the sink can also help alleviate some bottleneck. A fill up faucet by the range or a special clean up sink that is separate from the main sink area are two ideas on how to accomplish this task.

This kitchen incorporates two islands to provide the maximum amount of work space and storage and to help connect the kitchen area to the adjacent living room.

As already mentioned, a great addition in a social kitchen is a large island. This key feature can serve multiple functions that contribute to the features that make a kitchen a social kitchen. Ideally and most likely the island will be in an area that is close to another zone, be it a breakfast area with table and chairs or a living room type area with couches and a TV. This location allows the island to essentially serve a functional role in both spaces. The island can provide additional cabinet storage space and working countertop space. If hosting guests or holding a party, that countertop space can also be used as a serving area. The island also always seems to become a general gathering space for everyone. If someone is busy in the kitchen, family or guests tend to gather around the island to include whomever may be working in the kitchen into their conversation.


Without any walls separating the kitchen from the adjacent family room the two spaces feel like one room and allow the homeowners and any guests to easily interact between the two rooms.

Creating a space that feels open and has few visual impediments when it comes to seeing people anywhere else in the open floor plan is another important factor in the creation of a social kitchen. An obvious way to achieve this is by reducing the number of walls. Some walls are necessary, such as around the perimeter. But walls that float within the middle of the room or that block other general living spaces from the kitchen should be removed if possible. Any appliances that are tall or take up significant space should be located against the necessary walls so that they in turn do not impede the line of sight either. The other key item to focus on is cabinet placement. As with appliances, upper cabinets should be limited to areas where they can hang against a wall. Floating upper cabinets should be avoided at all costs. While this may cut down on available cabinet space in the actual kitchen, it does allow for the possibility to add cabinets in the general living spaces of the open concept area. In turn this will help add more connectivity and cohesiveness to the different zones.


This kitchen is spread out into a morning room and breakfast room to create more working space. The pictured breakfast room is home to the warming drawer and additional cabinetry for storage.

However, before jumping into the deep end and committing fully to the creation of a social kitchen there are a few downsides to consider. But luckily there are some ways around them that can help to ease any burden they create. One of the biggest downsides in that creating such an open and multifunctioning space can be that it create disorganization that hinders the efficiency of the space. Combat this by creating specified zones throughout the kitchen. If your kitchen has an island consider adding bar seating on the side that faces into the kitchen to give guests a place to easily gather without being in the way of whoever is working in the kitchen. Families with school aged children might want to create a specific homework zone that is stocked with all the essentials that might be needed. A nearby drop zone for belongings might also be a good idea. Within the functional areas of the kitchen itself try to create enough space for multiple work zones so that users of the space aren’t having to work on top of each other.

Project Spotlight: Remodel Brings New Life to Dallas High Rise Condo

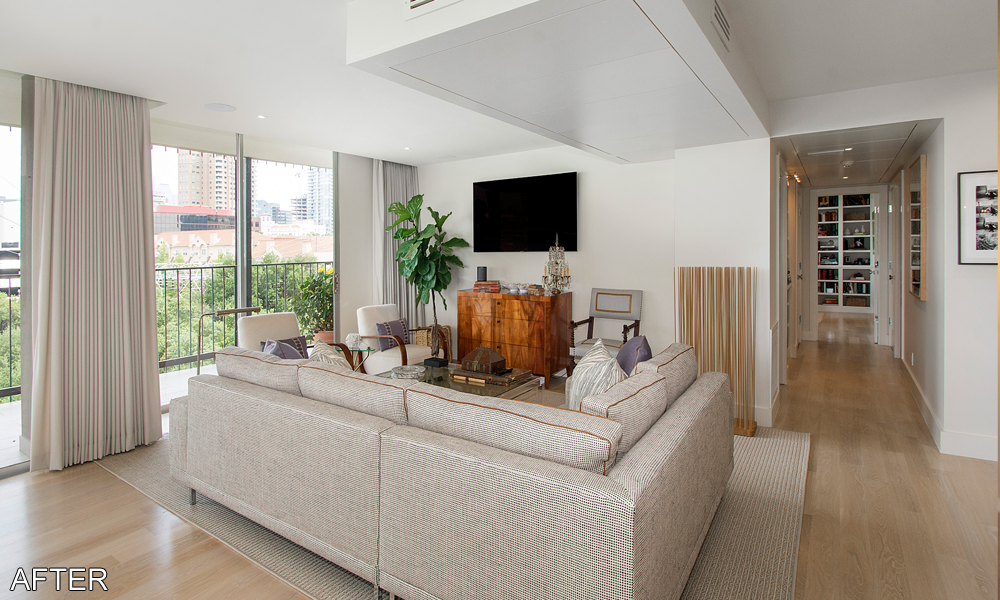
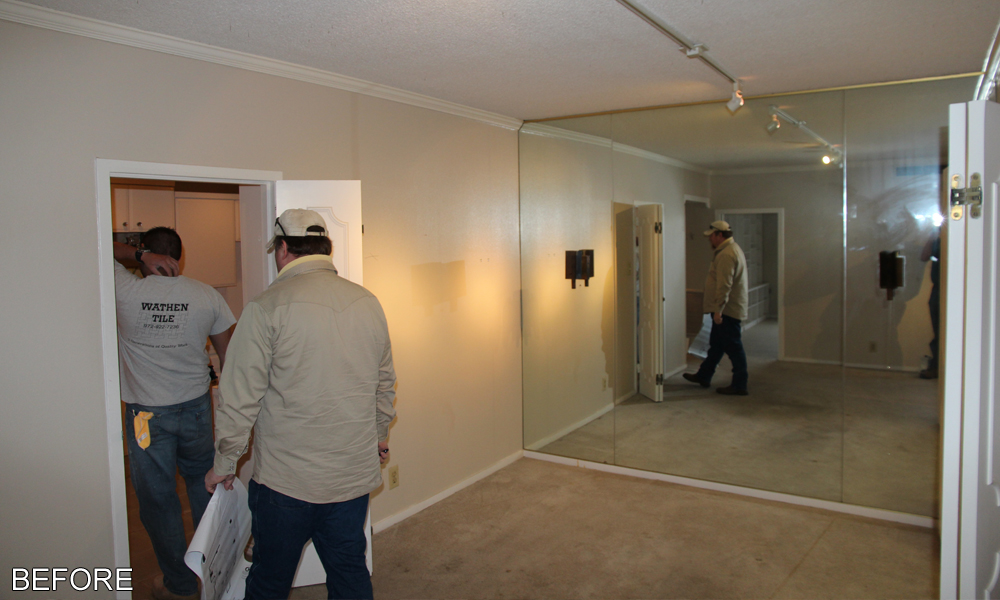
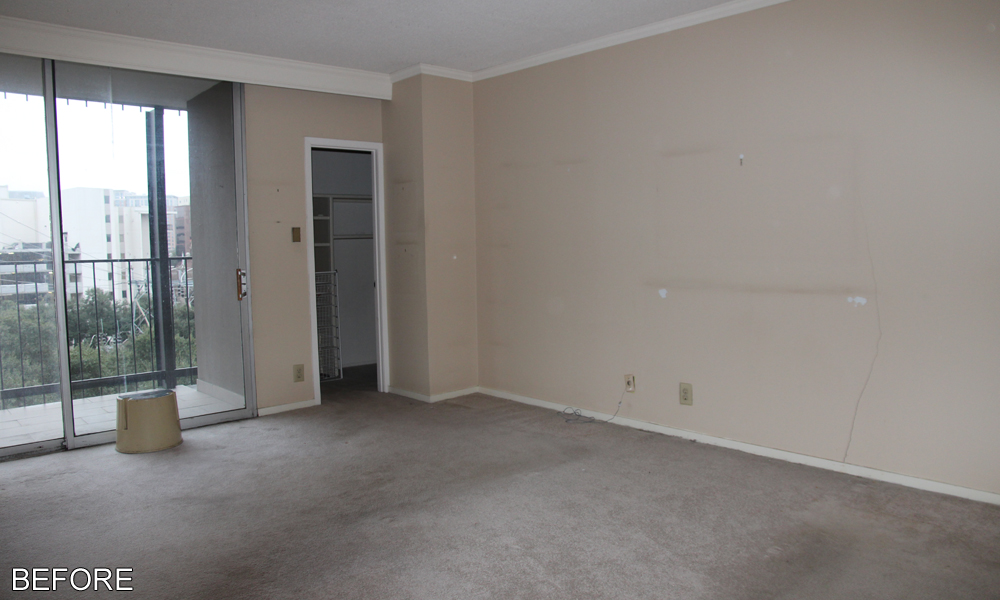
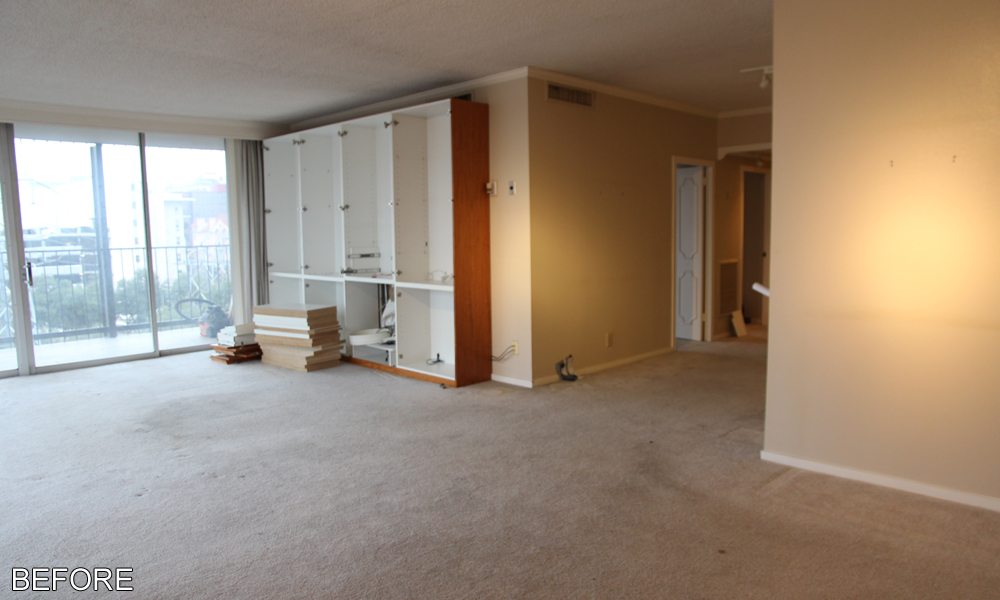
A high-rise condo unit remodel comes with its own unique challenges and opportunities. Fully remodeling this ninth-floor unit in Dallas was no exception to that rule. But one thing is for sure, despite the unique setting the results are still spectacular. Originally a three bedroom-two bathroom set up, the unit had a very outdated look that had not been updated in a long time, if ever. The space felt cramped, especially in the small enclosed kitchen, and used design elements that hadn’t been popular for at least a few decades. When the homeowner purchased the unit it was clear that some changes needed to be made to modernize and make better use of the available space. Keep reading to find out more about the stunning results of this latest Key Residential remodel.


The first step of this remodel was to rework the existing footprint so that it would better suit the homeowner’s needs. As the sole resident of the condo, the homeowner did not need all three bedrooms, so converting one of them was an easy place to start. The interior walls surrounding the third bedroom were removed so that it could become incorporated into the general living area. The former bedroom area was converted into an informal den area.


Next to the new den is the formal living room area. With the addition of the den, the original living room area could now be used as a formal living area. Both the den and the living room get to take advantage of the stunning view out of the floor to ceiling windows. Also connected to the den and living room areas is the new dining room area (more on the decision to move that space in a moment). A small bar area was created out of an old closet in the dining area and includes custom designed cabinets with a marble countertop, an undercounter beverage fridge, and a mirror backsplash with floating glass shelves.


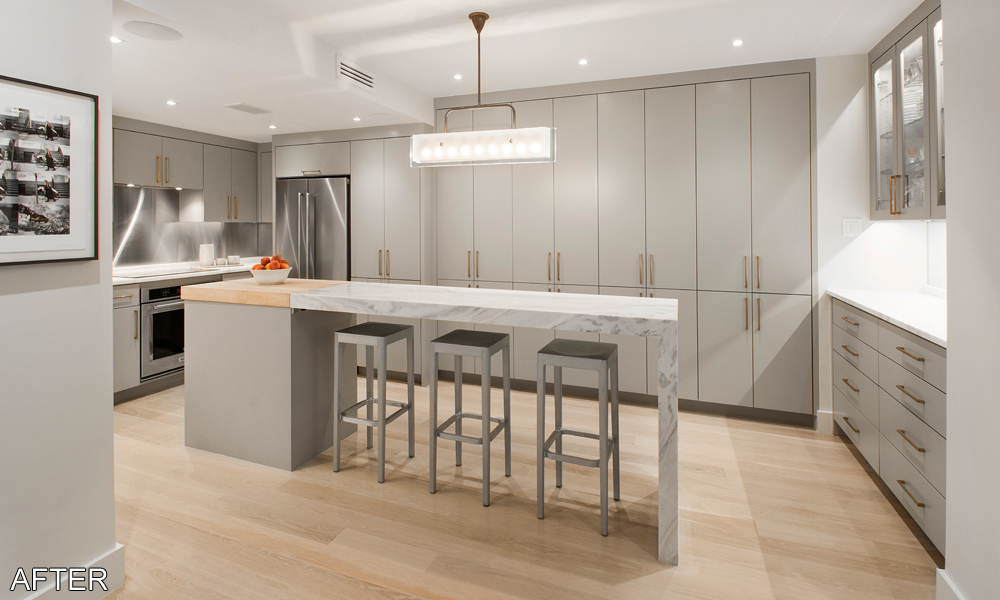
Another key area where space needed to be added was in the kitchen. The small, enclosed kitchen was vastly outdated and confined. Luckily the original dining area that was adjacent to the kitchen provided the perfect solution. The wall that separated the kitchen from the dining area was removed so that the kitchen space could be expanded. Doing this not only provided the kitchen with more space and a sense of openness, but it also helped to create a quasi-open floor plan feel with the adjacent den, relocated dining, and living rooms.


The new kitchen features custom designed gray painted cabinets with solid panel fronts, marble countertops, and brass finished hardware. The use of the brass finished hardware is uncommon in a world still dominated by the more popular polished nickel, but it helps give the kitchen a unique and distinct look. Along the sink wall open upper shelves were installed to provide additional storage space but not over clutter the kitchen with more enclosed cabinets. The cabinets were designed around a necessary structural column for the building that could not be removed. New KitchenAid appliances with a stainless-steel finish include the refrigerator, oven, dishwasher, and induction cooktop. The large undermount apron sink also has a stainless-steel finish that matches with the appliances.


The remodeled kitchen easily solves the enclosed and claustrophobic issue that existed previously. The additional space in the kitchen allowed enough room for a narrow, but long, island to be added that spans the width of the room. The island features a few extra drawers for storage as well as space for bar seating. The lack of cabinets below most of the island allows the bar seats to be safely stored out of the way when not in use. As with the perimeter cabinets, the island also features a marble countertop. The foot for the far end of the island uses the same marble countertop material and connects to the island with an infinity edge to give it one continuous look. The island also features a small section of custom butcher block countertop above the drawer storage section of the island.


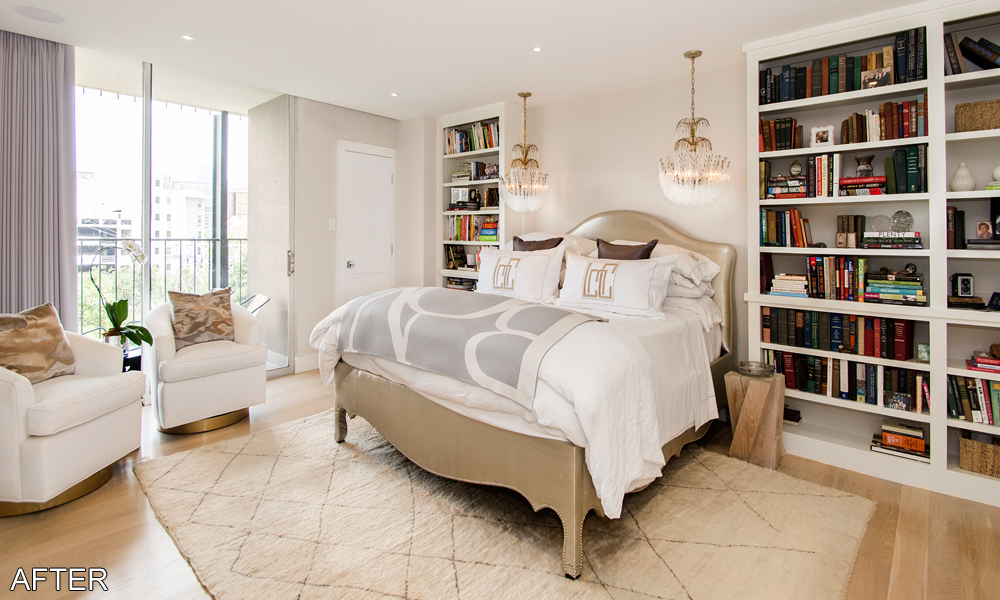
The master and guest bedrooms required minimal updates, but the small changes that were made still provided a remarkable difference in the spaces. Both rooms received new custom designed built in bookcases and new curtains. A fresh coat of paint and new trim did wonders in helping with their transformation. In the master bedroom dual chandeliers were hung over the head of the bed and lighting controls were built into the side of the one of the bookcases so that they could be used without leaving the bed.


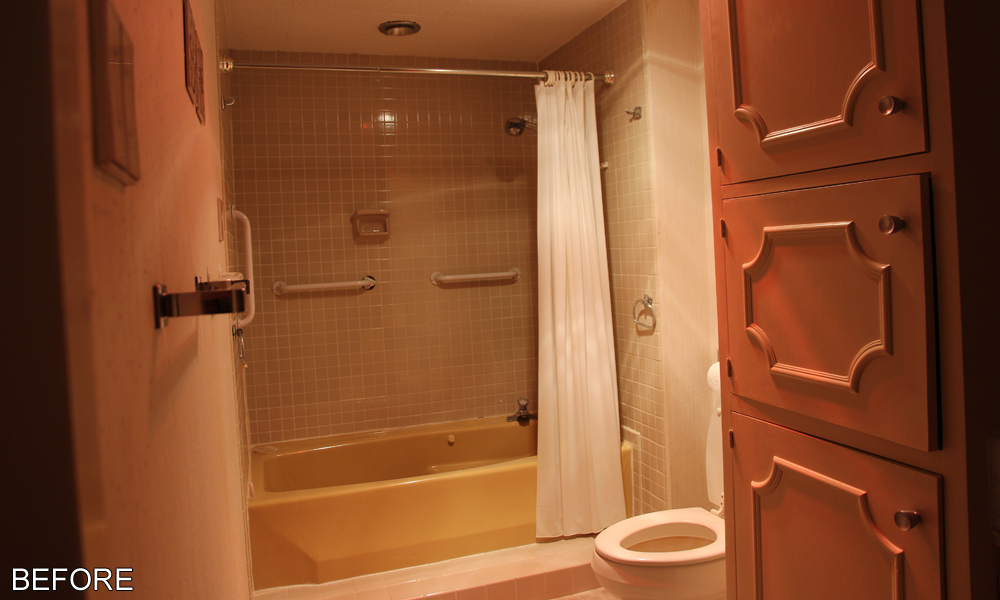
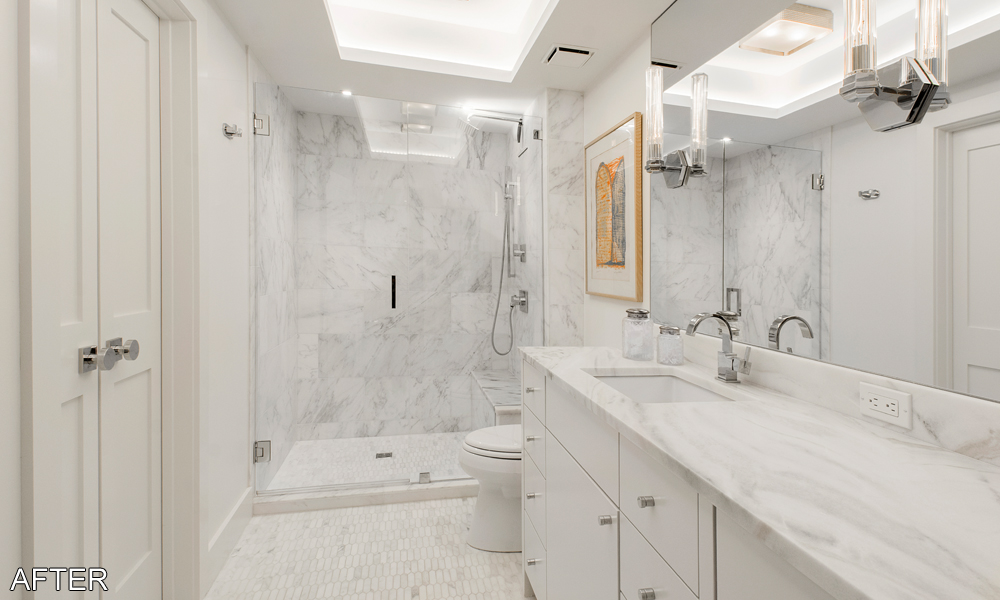
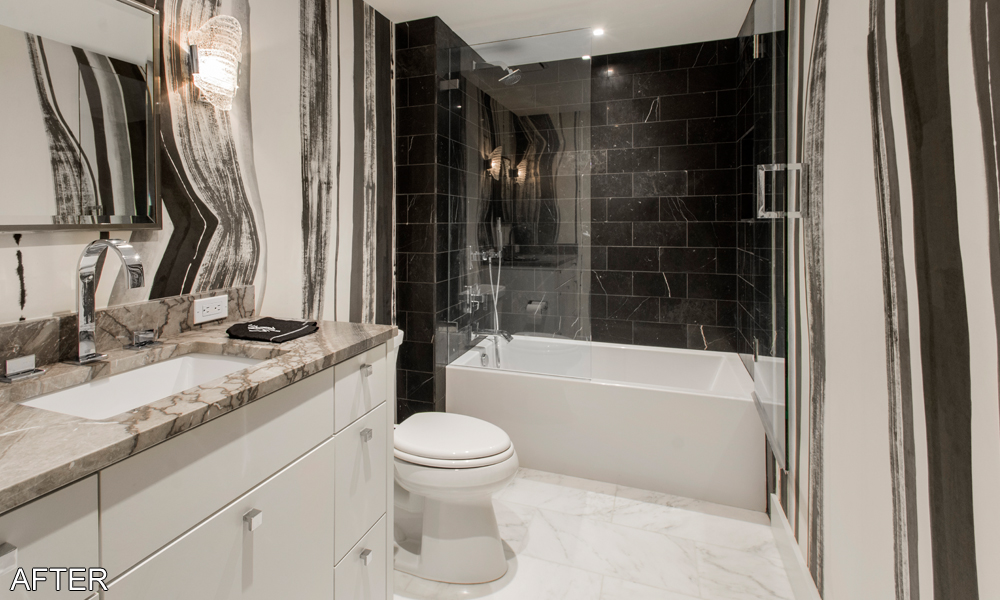
The two bathrooms were another area that saw quite a few updates. In fact, both were gutted and completely rebuilt with all new plumbing fixtures and cabinets. Within the master bathroom a few structural changes were made to make better use of the space. Originally the master bathroom was entered via a small hallway from the master bedroom. This hallway was removed and incorporated into the master closet and the master bathroom is now accessed directly from the master bedroom.


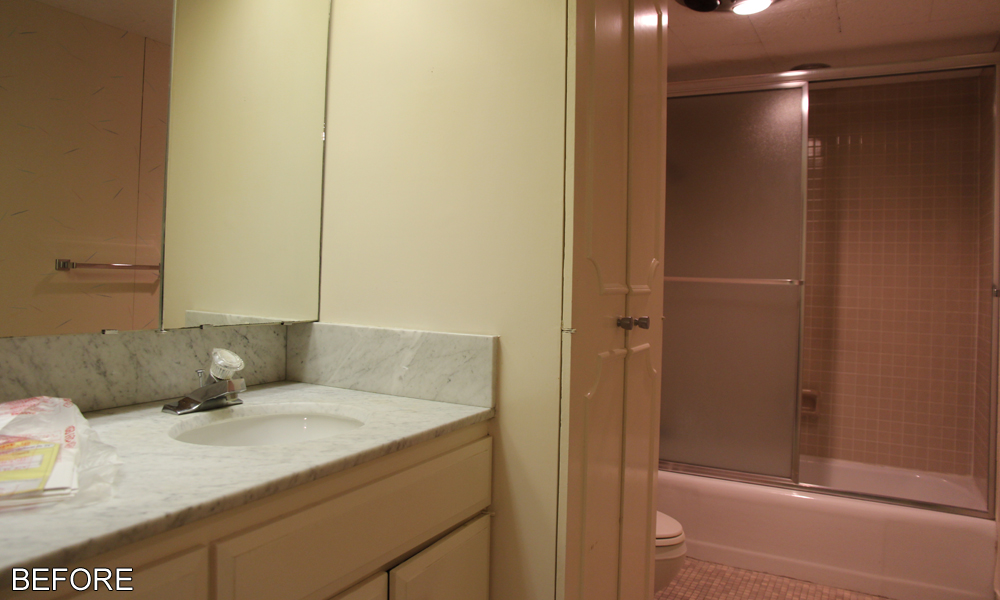
Both bathrooms received new custom designed vanity cabinets with marble countertops. The old floor to ceiling cabinets that were in both bathrooms were not replaced to promote a more open feel. In the master bathroom the old tub/shower combo was replaced with a large walk in shower. A light colored, marble designed tile that matches well with the vanity countertop was used throughout the master on the floors and shower walls. The shower includes a built-in bench and soap niche and a glass surround. In the guest bath the tub/shower combo design was kept, but the old tub was replaced with a larger contemporary styled tub and a glass surround was added to keep with creating a more open feel to the room. The dark tile surround in the tub/shower combo matches well with the hand painted black and white wallpaper used in the room.